Tag Archives: garlic powder

Cajun Blackened Tempeh

We found some easy prep red beans and rice and decided to make a Cajun meal (or our version of it) using that, some steamed green beans that we topped with BacUn from Pure Market Express and some spiced tempeh that we coated in our home-made rub and blackened under our broiler.
1 tbsp dried oregano
1 tsp paprika
2 tbsp onion powder
1 tbsp garlic powder
1/2 tbsp cracked black pepper (feel free to grind the whole peppercorns with the mortar and pestle)
1/4 tsp cayenne
1/2 tsp salt

IMG_2423

After mixing these spices in a bowl I rolled each piece of tempeh (I recommend marinating it in some veggie bouillon or your favorite marinade for 1-2 hours, some tempeh can be dry) in the mixture. I placed the tempeh in a dish and covered it lightly with a paper towel. I then microwaved the tempeh for 2 minutes total for 30 seconds at a time, turning it over between sessions.

IMG_2425

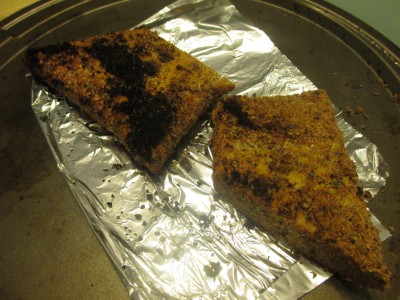
Then I put it on tin foil and placed it near our broiler on each side for 2-3 minutes or until it started to toast.

IMG_2427
The result… happy Brent and happy Christie.

Tagged , , , , , , , , , , , , , , , , , , , , , ,

Potato Wedges with Aioli

Friends and family should be arriving soon so here’s a local and personal favorite for entertaining. We’ve got a lot of Spanish influence in Miami and something that they’ve created that’s right up my alley is Catalan Allioli or aioli. It’s a mixture of olive oil, lemon juice, garlic, water and sometimes egg yolks. There won’t be anymore talk of eggs today.

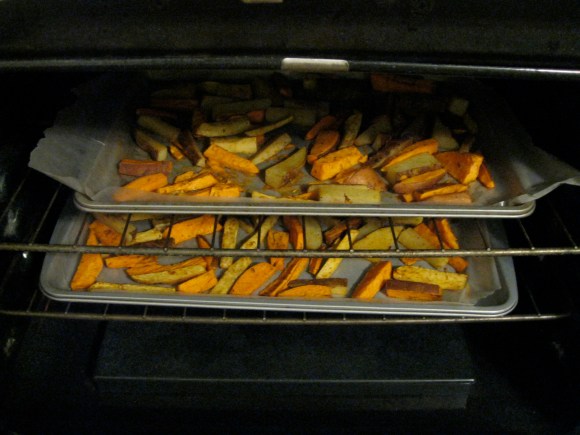
I chopped some sweet potato (because it’s that time of year), yam and russet potato into wedges ranging from finger to thumb thickness and length. I tossed them in a mixture of the following:

2 tbsp corn oil (corn oil is important because it has a high flash point and won’t form carcinogenic substances as easily when baking at high temperatures)

1/2 tbsp onion powder

1 tsp garlic powder

1 generous pinch of paprika

1 pinch of nutmeg

garlic salt to taste

I tossed the potatoes until they were coated with the spice and oil mix and them laid them out on a metal baking sheet lined with waxed paper. I baked them at 375F/190C for one hour.

While you’re waiting on your potatoes, it’s time to make some dipping sauce. I made 2 sauces.

One was my chipotle lime sauce and the other is the aioli. Combine the following:

1/2 cup of vegenaise

1/2 tsp Dijon mustard

3-4 cloves of garlic, finely minced

2 tbsp water

1 tbsp olive oil

It is possible to mix this in a food processor or blender but I don’t recommend it: it can be very thick and you’ll forever be scraping sauce off the walls of your blending device. Mix these well using a fork in a shallow dish, prepare for dipping satisfaction!

This is Christie, signing off!

Tagged , , , , , , , , , , , , , , , , , , , , , , , , , , , ,

Spinach Artichoke Dip 2

I made a spinach artichoke dip a while ago that’s based on soy which is my favorite source of creaminess. In this particular recipe I’m using white beans for the people that I love who cannot eat soy. The nutritional profile is similar: iron, fiber, no cholesterol, low fat, rich in protein, vitamins and minerals and the flavor is just as awesome. We started with the following:

1 tin of white beans, drained OR 1 cup of white beans, soaked and [pressure] cooked

1 tin or jar of artichoke hearts, drained and chopped

1 10 ounce package of frozen spinach

1 small onion, diced

6 cloves of garlic, minced (more if you love garlic as much as I do)

1 tbsp onion powder

1 tbsp garlic powder

2 tbsp nutritional yeast

2 tbsp vegan parmesan (optional)

1 cube of veggie bouillon (we used Rapunzel)

1 tsp of flaked red pepper

1 dash of cayenne

1/2 tsp of paprika

juice from 1/4 of a lemon

2 tbsp vegan mayonnaise

1/4 cup of Daiya (optional)

Okay, so that seems like a lot of ingredients. It was really simple to make. Preheat your oven to 350F/175C… this won’t take long.

I put all of the ingredients into a bowl while my expert moosher went to work mooshing everything into oblivion. If you’re interested in something that’s creamier, I’d recommend putting the white beans into your blender or food processer first and blending until smooth but I like a little texture and Brent’s muscles are a sight to see mooshing  those beans. We had to microwave it a few times to thaw the spinach.

Once it was all mixed I put everything into a loaf shaped baking tin and put it into my oven for 25 minutes. It came out smelling divine and tasting even better. I burned my mouth being so enthused about getting some of our creation into our mouths.

The Daiya and parmesan do make this richer but it wasn’t missing anything when we made it with one or the other or neither. It was still creamy, rich, delightful spinach artichoke dip, perfect for parties or snacking.

This is Brent and Christie, signing off.

Tagged , , , , , , , , , , , , , , , , , , , , , , , , , , ,

I Love Freeze-For-Whenever Olive Black-eyed Pea Burgers!

I’ve been battling mooshy burgers since I started making vegan burgers. I’ve found that if they’re firm enough, they’re often too dry. If they’re moist enough, they moosh out the side of your bun. What is a girl to do?

I decided to experiment with making frozen patties because it seems to work so well for all those store bought brands. I assembled the following:

1 cup of black-eyed peas, soaked OR 1 can of black-eyed peas, drained and rinsed

1/4 cup of sliced olives

1/4 cup of mushrooms, chopped (optional)

1/4 onion, chopped

1/4 cup bread crumbs (I chopped some gluten-free bread in my food processor)

1 tbsp onion salt

1 tsp garlic salt

2 tbsp cumin

1 tbsp coriander

2 tbsp corn oil

red pepper flakes and salt to taste

If you’re using dried beans, take a moment to microwave them in water 3-4 times at 2 minute intervals to soften them slightly. We put all the ingredients into a bowl and I set my expert moosher (that’s Brent) to power moosh. It wasn’t long before it was looking and smelling like burger material so I started scooping the mixture into some plastic freezer safe containers.

I made sure that the patties were compacted and of a relatively uniform thickness, about 1/2-3/4 inch. I put a piece of plastic wrap over it and then used the next one to help compact the burger. I put them in the freezer until I was ready to use them.

These were actually some of the best burgers Brent and I have prepared. They were moist and held together and had a pleasing dense texture. They tasted enough like ground beef to be a little disturbing. I have no desire to eat cows!

I am going to take a moment to discuss why ground beef isn’t so great for your body. The obvious stuff aside (cholesterol, saturated fat, hormones and antibiotics) cooking beef or any meat is a tricky business. Preparing meat for food means balancing microbial contaminants with carcinogenic compounds that are formed when meat is cooked. Big agribusiness has made the case that they cannot ‘efficiently’ process large volumes of animals without some inherent contamination by the animals’ feces. This means that if you buy meat, it’s got poop on it and the law says that’s okay. They cover their butts (pardon my language) by saying, “Cook it thoroughly.” Which translates to, “If you get sick it’s your fault for not cooking it thoroughly.” Try telling that to the hundreds of thousands of people that get some form of food poisoning or another every year from eating meat.

So fine, meat is ‘safe’ if you cook it thoroughly but back to the issue of how cooking fundamentally changes the composition of what you’re eating.  Smoked and cured meats have long been the accused culprits of causing colon cancer partly because of how they’re prepared: prolonged exposure to heat. Cancers of the digestive tract are among of the most common and more deadly kinds of cancer, one in 6 will get it and one third of those will die from it within 5 years of being diagnosed.

So you can follow some tips to reduce the risk of introducing carcinogens into your diet or you can skip straight to legumes and other plants (including black-eyed peas!) which have long been associated with a reduced risk of colon cancer. One of the likely reasons for this activity is phytic acid . This is one of those small molecules that makes biochemists like me swoon but it’s properties speak for themselves. In the context of a Western diet the ability of phytic acid to sequester certain minerals that, in excess, can cause the kind of oxidative stress on the lining of the digestive tract that can eventually lead to cancer. Phytic acid when bound to fluoride from your drinking water, for example, will be excreted in your waste. Still, you can easily reduce the amount of phytic acid by soaking legumes them overnight or sprouting if you’re worried.


I think I’ve rambled enough. Time for burgers! Just pop them out of their frozen container, no thawing necessary and cook on medium high heat until they start to brown. Mine are a little charred… probably why they reminded me so much of ground beef, but they were definitely firm on the outside and moist and delightful on the inside. Yay!

This is Christie and Brent, signing off!

Tagged , , , , , , , , , , , , , , , , , , , , , , , , , , ,

Rosemary Garlic Roasted Potatoes!

I’m a big fan of potato. I think it’s a vegetable that gets a bad rap due to all the Atkins style carbohydrate bashing. Potatoes are actually a delicious source of protein, fiber, vitamin C and iron as well as a bevy of other important trace nutrients like niacin, folate and B6. They’re also versatile and easy to work with whenever you want something tasty.

You’ll need the following:

5-6 fist sized red potatoes, cut into bit sized pieces

1 tbsp rosemary

1 tbsp onion powder

1 tbsp garlic powder

juice from 1/2 lime

6-7 cloves of garlic, minced

1-2 tbsp corn oil (or any other oil suitable for high temperature cooking)

garlic salt and flake red pepper to taste

Pre-heat your oven to 375F/190C. Place the potatoes and the rest of the ingredients into a large bowl and stir until they’re evenly coated. Spread them out on a foil lined sheet and bake. Depending on the size, they’ll be ready after 40 minutes if they’re on the small size (3/4 inch cubes) and longer if they’re bigger.

We served this up with some steamed asparagus. I trimmed the asparagus and steamed them in the microwave by adding a little water to the bottom of a large bowl and the asparagus on top. Three minutes was all it took for lightly steamed crisp veggies.

We also tried something new: vegan mahi mahi from Veggie Brothers. I’m usually wary of vegan meats because they’re usually ersatz and expensive. I was impressed by the flavor and texture, especially given the attractive appearance. It was tasty but overpriced. We bought a ‘single serving’ and split it. At $5 per person, it wasn’t quite worth it. I do look forward to seeing more from them and hopefully a price drop.

This is Brent and Christie, signing off!

Tagged , , , , , , , , , , , , , , , ,

Vegan cheesy toast, scramble and bacon!

This is just a different assembly of some of our favorites which we casually call “the Heart Attack-Free, All-American Breakfast”. Side note: we’re really lucky to have located a bakery that will make custom gluten-free vegan bread for us. I find that most store bought varieties of gluten-free bread aren’t always vegan and even when they are, they taste like cardboard and sawdust. Below is Karin’s awesome multi-grain and -seed bread with Follow Your Heart mozzarella melted on top.

I sincerely hope that you don’t have to work too hard to find someone who can make awesome bread for you too! We toasted some vegan bread in our oven while scrambling some tofu and smoky maple bacon tempeh.

Above is our finished breakfast. It’s pretty kid friendly and I imagine that even a few non-vegans might be interested. The cheese, bread and tempeh were pre-made so we’ll just talk about the tofu.

Our standard tofu scramble is as follows:

1 carton of silken tofu

1 pinch of turmeric

1 pinch of paprika

1 tsp garlic salt

2 tsp onion powder

1 tbsp nutritional yeast

garlic salt and flake red pepper to taste.

a touch of black (sulfurous) salt is a great addition but isn’t necessary

Sometimes I add chopped tomato, as I did in this case. We just throw everything into a pan and mix until it’s hot and awesome (Brent is in the background working on the tempeh). 

Sauteed mushrooms or chopped basil also make a great addition to any tofu scramble. I see a lot of variations on this theme, so I encourage you to experiment: adding scallions, chopped tomato, sun dried tomato, minced onions or garlic, chopped bell peppers, or whatever blows your hair back. I also know a lot of people use Chinese style tofu. I prefer silken tofu… it reminds me of runny eggs. If you’re a tofu scramble pro, I’d love to hear what you do.

This is Christie and Brent, signing off!
Tagged , , , , , , , , , , , , , , , ,

Polenta Balls

I really wanted just a simple salad for dinner tonight, but I wanted something to accompany it. So I came up with this simple and yummy and versatile recipe using instant polenta.

Polenta Balls

4 tbsp instant polenta
1 tsp garlic powder
1 tsp salt
1 tsp nutritional yeast
1/4 tsp cumin (optional)
1 cup boiling water

First, I combined my dry ingredients in a bowl while the water heated up.

I added the boiling water and mixed it all together until it thickened and was the consistency of polenta.

I shaped the polenta into little balls, placed them on a baking sheet, sprinkled some salt on them, and baked them in the toaster oven for 15 minutes at 325 degrees. While they were toasting, I made my salad.

My salad should have been prettier, but my avocados were gross, I forgot ‘cheese,’ and I forgot to get some olives. It was still good, though: a nice mix of butter lettuce, tomatoes and green onion tossed together with some olive oil, lemon, salt, and pepper.

The polenta balls turned out exactly how I had hoped: crispy on the outside and soft on the inside. I’m excited to try making more with different spices.

Yay! Polenta Balls! –Melissa

Tagged , , , , , , , , , ,

Pumpkin Seed Salad Sandwiches

I was never a fan of tuna salad: a lot of the ingredients creeped me out, particularly tuna and mayo. Mayonnaise is a creamy mix of oil and eggs which never comforted me conceptually. This was even before I became obsessed with microorganisms starting in high school, afterward, anything containing animal products, mixed up and possibly left out for hours and hours at room temperature turned my stomach. Even so there are a lot of things about tuna salad that I like, other than the promise cruelty and fishy smells. We decided to make pumpkin seed salad sandwiches for dinner today taking all of the things that are awesome about tuna salad and omitting the parts that stink… literally. We combined the following in a food processor:

1/2 cup of pumpkin seeds (soaked 8 hours)

1/2 cup of flax meal (more if you want a dryer mix)

1 tbsp nutritional yeast

1 generous tbsp tahini

1 tsp garlic powder

1 tsp onion powder

1 dash hot sauce

juice from 1 lemon

I ran my food processor until the mixture was still chunky but relatively uniform and then I added a generous bunch of dill. I ran it until the dill was all mixed in and then added 2 stalks of celery that Brent chopped.

We put it on some bread that we toasted with some Follow your Heart gourmet cheddar cheese. This cheese was okay. The texture was pretty good and the flavor was reminiscent of the cheap orange cheddar that I was never particularly fond of anyways. It got soft when toasted but didn’t really melt like dairy cheese.

Back to the issue at hand, we smothered our sandwiches with our lemon dill spread and I have to say they were fabulous. If I had this to do over again, I might add a few tablespoons of veganaise  but it doesn’t need it. I might also try substituting sunflower seeds for pumpkin seeds but that’s also an arbitrary change.

We also included some sprouts that we started on Sunday. They’re usually ready by Thursday and make a difference for any wrap, salad, or sandwich by adding texture and spice. I also found some delicious multi-grain bread at a local farmer’s market so the guy was able to have a simple sandwich for the first time in a while. It was definitely a welcome change.

This is Christie and Brent, signing off!

Tagged , , , , , , , , , , , , ,

Tofu Burgers with portobello mushrooms!

I’ll make just about anything into burgers. I just like the format. In this particular case we tried using a beloved burger recipe as a stuffing for portobello mushrooms. Whether you want patties or stuffed ‘shrooms, all you need to do is gather the following:
12 oz silken tofu
2/3 cup quinoa flakes (rolled oats work too)
1 tbsp flax meal
2 small carrots, grated
2 small stalks celery, chopped
2 tbsp nutritional yeast (optional)
2 tbsp onion powder
2 tbsp garlic powder
1 tsp cumin
tamari or soy sauce to taste

I shredded my carrots and celery in my food processor. I put everything into a bowl with the tofu and then Brent went to work mooshing. Watch him showing this future burger mix who’s the boss. You can also use a food processor but Brent is an expert moosher. Add more quinoa flakes if you find they’re not firm enough.

Shape into patties. Heat a skillet or grill and grill the burgers until each side is crispy and golden brown.

We decided to use it as a stuffing for portobello mushrooms and that’s just another option. We baked some portobellos drizzled lightly with balsamic vinegar at 350C/180F for 10 minutes.

We then stuffed each mushroom cap with the burger mix and baked an additional 20 minutes.

We topped with cheese and baked another 10 minutes. This is Heidi Ho organics, chipotle cheddar. We liked that it was low calorie (about half that of dairy cheese) and it had a nice chipotle flavor but it wasn’t particularly cheesy and didn’t melt like some other vegan cheeses. This didn’t stop us from eating the entire block. It was tasty, just not cheesy.

These burgers were definitely a hit. We ate all three and then fried up the rest of the burger mix and dipped it in buffalo sauce. They came out crispy and tender. Double win! If you try it, let us know what you think. Until then, stay tasty!

This is Brent and Christie, signing off!

Tagged , , , , , , , , , , , , , , , , ,

Easy Baked Eggplant

Eggplant is awesome. It’s purple… sometimes white or marbled, and versatile. This recipe is an easy addition to any meal: it’s low in calories, tasty and easy to prepare. Most of the calories in this recipe come from the almonds. Almonds are a great source of omega-3 and omega-6 fatty acids. These two nutrients are often overlooked by vegans. Omnivores get them from fish along with such delicious contaminants as heavy metals mercury and lead or pesticides like DDT. Flax seeds and nuts are a great source of these nutrients that are vital for brain function. Your brain is the fattiest organ in your body! Weird, right?

For this recipe slice your eggplant into one inch thick pieces and ‘bread’ it in a mixture of the following:

1 cup of almond meal

1 tbsp onion powder

1 tsp garlic powder

1 tbsp nutritional yeast

a pinch of salt

Now place the pieces on lightly oiled tinfoil (I rest each on top of 3 almonds or sprinkle some corn meal for better air flow), cover with foil, and bake it at 375F/190C for 25-30 minutes.

After this you’ll remove the foil and poke with a knife every 5 minutes or so until they’re tender.

Just imagine this smothered with pasta sauce and melted soy cheese… Okay, I’m drooling.

This is Christie, signing off!

Tagged , , , , , , , , , , , , , ,