Tag Archives: pecans

Granola: not just for hippies and hikers anymore!

Food dehydrators aren’t just for apple chips and other dried fruits and veggies. They’re also great for making your own granola. Brent and I have a generic recipe that’s pretty much fool proof.

1 cup rolled oats

1 cup buckwheat groats

1 tbsp flax or sesame seeds (optional)

1 cup dried fruit (we’re using 1/2 cup dried cranberries and 1/2 cup goji berries)

1 cup  nuts (we’re using slivered almonds)

1/2 cup shredded coconut (optional)

1 tablespoon of carob or cocoa powder (optional)

2-3 tablespoons of  jam (we’re using raspberry)

Combine the following in a large bowl and mix in the jam until the mixture begins to stick together. Spread it out on a drying sheet and dehydrate 4 hours. My dehydrator doesn’t have any heat settings or a timer. If yours does, don’t worry: this is fool proof, remember?

Buckwheat groats add a lovely crunch even if you decide not to add jam and dehydrate the mixture. When we make that instead, we call it museli. It’s got less sugar and is just as delicious. We put museli and granola over soy yogurt, fresh fruit, non-dairy ice cream or with regular cereal. It’s also great by itself as a snack. Buckwheat, oats, nuts and dried fruit are loaded with balanced protein, soluble and insoluble fiber, iron, essential fatty acids, important trace minerals and lots of vitamin C and B vitamins.


It’s also versatile: you can add a pinch of cinnamon if you’re so inclined; switch jam for rice nectar or maple syrup; add any fruits you like – apples and bananas are great! Use quinoa flakes instead of rolled oats… okay, now I’m hungry.

This is Brent and Christie, signing off!

Tagged , , , , , , , , , , , , , , , , , , , , , , , ,

Fiddleheads and Ramps: Wild Harvest!

Nothing screams spring to me quite like fiddleheads and ramps. Fiddleheads are the newly budding tips of ferns that are common to the Northeast and ramps are wild leeks. The two make a fabulous pair and can make any meal visually stunning and delicious.
Fiddleheads are the easier of the two to recognize. They can be harvested from several different varieties of ferns: cinnamon fern, royal fern, zenmai and vegetable fern. These grow all over the world but aren’t cultivated by farmers. If you decide to harvest your own, the rule is to harvest fewer than half the fiddleheads from any one plant to allow the plant to survive the assault and produce again the next year. Be careful that you know your ferns, some are thought to be carcinogenic; specifically ostrich fern and royal fern. That being said, this isn’t quite as harrowing as hunting wild mushrooms. Note which varieties of ferns grow in a particular area when they develop fully and then you’re set for the next spring when you go fiddlehead hunting! Caveats being made, these vegetables are an incredibly tasty,  nutritious and filling addition to any meal and they also can be stored by freezing.
The flavor in ramps varies from root to tip. The bulbs have an intense and unique flavor that marries the best elements of onion and garlic. The stem is reminiscent of scallions and the leaves remind me of spinach with a touch of asparagus flavor. Subsequently, I advocate using as much of the plant as possible since the entire plant is harvested and the whole thing is delicious.
When I was a kid we would make this dynamic duo into a salad with chicken and toasted nuts. I loved the flavors but was terrified of chicken and egg products that sat at room temperature for hours and hours. Horrifying thoughts aside, Brent and I decided to try it with soy curls instead and were delighted with the result.
To start you’ll want to gather the following ingredients.
1.5 cups dry soy curls
3 cups water
1 cube veggie bouillon
15 ramp bulbs, peeled and ends chopped off
chopped ramp greens
ramp stems, the red sections, chopped
1/2 cup fiddleheads
1/2 cup vegenaise
juice of 1/2 lemon
1/4 tsp flake red pepper (optional)
1/4 cup chopped toasted nuts (optional)
1/4 cup dried cranberries (optional)
Prepare the water and bouillon in your microwave in a microwave safe bowl. Heat the water at one minute intervals until the bouillon dissolves with light stirring. Add the soy curls. Heat as before until the water is mostly absorbed. Saute with olive oil until lightly browned and crispy. I like to refrigerate this dish in order to cool it, but this salad is also delicious when warm.

Separate the bulbs, stems and greens from the ramps. Saute the bulbs

and fiddleheads until the fiddleheads start to get tender.
Add the greens and stir until they wilt. Refrigerate to cool, if desired.
Combine the soy curls, greens and red stems with the rest of the ingredients. We used Follow Your Heart grapeseed vegenaise. It’s pretty awesome. We also omitted the cranberries. Serve on toasted bread.If you don’t have ramps and fiddleheads, substitute asparagus for the fiddleheads, spinach for the ramp greens, green onion for the ramp stems, and leeks for the ramp bulbs. Wow… that’s way more complicated. If you’re sensitive to soy, seitan or chickpeas would make a great substitute for soy curls. If you’ve got an allergy to pecans, toasted sunflower seeds have a great flavor and crunch.

Really, this stunning and delicious. It was crisp herbal flavors married to the nutty savory soy curls all mellowed out by lemon and vegenaise. We had it with a crisp glass of red wine and savored a lazy Sunday.

This is Christie and Brent, signing off!
Tagged , , , , , , , , , , , , , , , , , , , , , , , ,

Stuffed Peppers and Creamy Chipotle Sauce

Stuffed peppers or chiles rellenos are pretty popular here in South Florida but I don’t like what a lot of them are stuffed with so I’m presenting you with a light flavorful version that’s vegan and gluten-free. Recognize!


The other half of my dynamic duo sliced 3 peppers in half and removed the seeds and white ribs carefully with a sharp knife.

Meanwhile I microwaved the following in a microwave safe dish:
2 cups water
1 cup quinoa (rice is fine too but cook the rice and bouillon separately from the rest of the seasonings and combine before stuffing)
5 sun dried tomatoes, sliced
4 cloves of garlic, minced
1 stick of celery, diced
1/4 cup chopped cilantro or parsley
1/4 onion, diced
1 cube of veggie bouillon
1/2 cup of chopped pecans (walnuts are fine but pecans are more “Southern” and the sweetness will help balance the chipotle cream sauce. Did I mention there’s chipotle cream sauce involved in this recipe? Yeah, awesomesauce. )

Microwave, stirring between 2 minute intervals until all the water is absorbed. Taste it and add salt and pepper to taste. When it’s ready, stuff your peppers with it! Bake in a 350C/180F oven for 35 minutes.

So I really like creamy sauces but don’t like the calories or indigestion that dairy so faithfully delivers so I use silken tofu for a lot of things that should be creamy. I combined the following in my blender for a spicy sauce that compliments the savory peppers perfectly.


1 box silken tofu (I use MoriNu)
juice from 1-2 limes
1 can of chipotle peppers in adobo sauce (this makes it REALLY spicy, like sweating while you’re eating it spicy. Most people will like the spice that 2-3 individual peppers plus a spoon of the liquid from the can.)

I blendend it until it was smooth and creamy and then plated it with some fresh cilantro, a dash of hot sauce, some smoked paprika and one of my peppers.

This is one of those really pretty dishes that’s almost too easy to make. It’s also high in protein and low in fat, hey whatcha think about that!?

This is Brent and Christie, signing off!

Tagged , , , , , , , , , , , , , , , ,

Coconut Lemon Custard PIE!

I got some Meyer lemons at our local market. Is there anything these crazy Floridians won’t grow?
Image
Anyways, Meyer lemons look like lemon colored oranges and tastes like a lemon would if it wasn’t acidic… at all. They’re mildly fragrant and delicious. I decided to make them into a lemon coconut pie. This is what I started with:
6 Meyer lemons
1 1/2 cup of shredded coconut (unsweetened)
4 tbsp coconut sugar
1/3 cup of cashews
1 box of silken tofu
1 tsp vanilla extract
1 tsp coconut extract (optional, if you don’t have coconut sugar)
1 tsp of arrowroot starch
1 tsp of vegetable gelatin
1 pinch of salt
I combined the lemon juice (be careful to exclude seeds and any rind from the mix as it will make the pie bitter… like mine was /sadface) tofu, half the coconut, cashews, vanilla extract, sugar, starch, gelatin and salt.
Image
I blended them until they were smooth and then poured them into a saucepan and heated it to marry the flavors. While I did this, I adjusted the seasonings. After it was steamy and warm, I poured the mixture into a springform pan over a crust in the style of Melissa’s previous raw cheesecake experiments  using another 1/2 cup of coconut in addition to the nuts and dates.
Image
I sprinkled the remaining coconut over the top and put it in the freezer for about 20 minutes and them moved it to the refrigerator. The texture was light and smooth.
Image
I did get a little too much of the rind from the lemons into the custard and it made the end product slightly bitter but it didn’t stop us from devouring most of it.
Image
The coconut and lemon were complimented beautifully by Melissa’s date crust. WIN!
This is Christie, signing off!
Tagged , , , , , , , , , ,

Raw Cheesecake Experiment #2: OH YES

Remember Raw Cheesecake Experiment #1? I finally found the time and motivation to try making another raw cheesecake. Having learned a lot from my first attempt at making the cheesecake, I made adjustments to both the recipe and technique for my second attempt.

Raw ‘Cheese’cake: Part Deux

Crust
8 dates, pits removed
3/4 cup pecans
unsweetened coconut flakes (optional)
pinch of salt

Filling
3 cups raw cashews, soaked for 3 hours
1/3 cup lemon juice
2/3 cup agave nectar — I used raw organic agave nectar this time
2/3 cup coconut oil
2 tsp vanilla extract
1/3 cup water
unsweetened coconut flakes (optional but highly recommended, OH MY GOODNESS)
chocolate chips (optional)

On the day you are making the cheesecake, measure out your cashews and soak them in a big bowl. Rinse the nuts: I filled the bowl with water, let it sit for a minute, poured the water out and repeated that 3 times until the water was a little cleaner. I did this a couple more times over the three hours I had them soaking.

A little before the three hour mark, I measured out my pecans and then dropped my jar of coconut oil in a bowl with hot water. I popped the dates in the microwave for about 10 seconds so that I could easily get the pits out with my hands. I don’t think it’s necessary to soften them at all since that probably makes them more sticky and more difficult to deal with in the food processor.

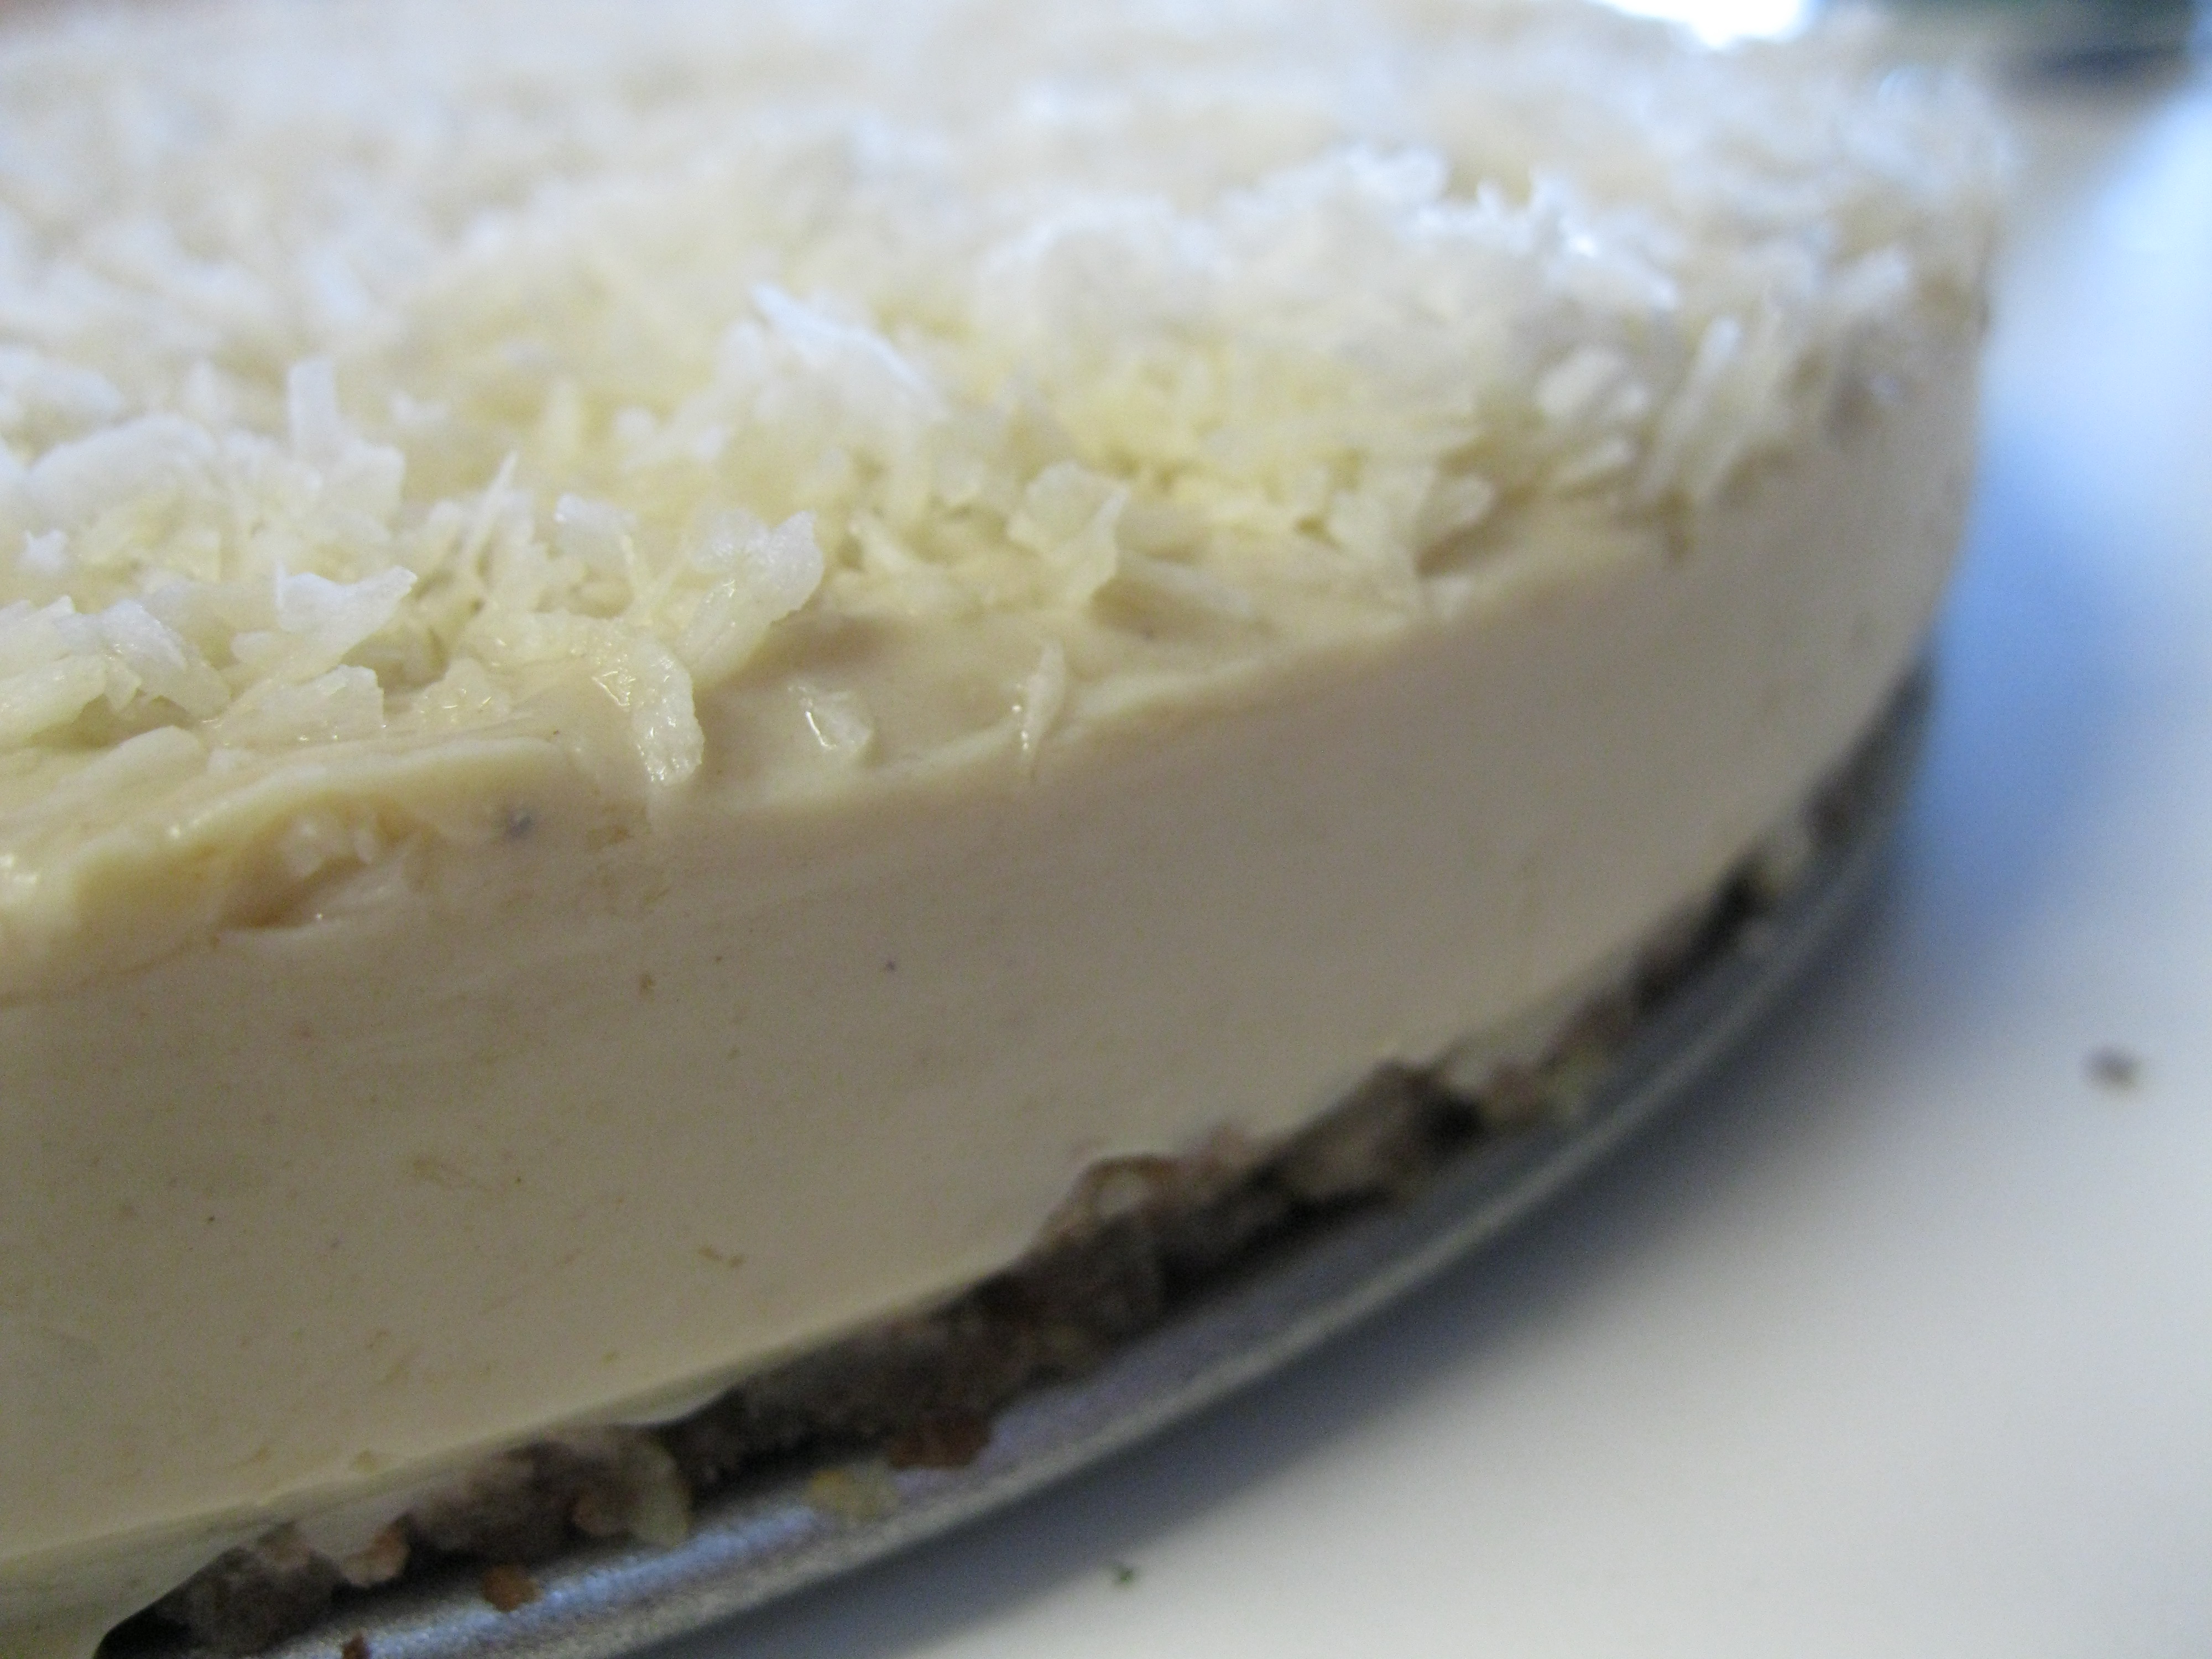
To make the crust, stick all the pecans in the food processor and chop up those suckers. This is important. Once you add your dates, you’re basically screwed out of getting good-sized pecan bits. Once the pecans are in tiny little pieces, go ahead and process the dates. When you’re *almost* close to having it to desired texture, add a pinch of salt.  When your crust mixture is done, get your cheesecake pan and sprinkle some coconut flakes evenly on the bottom of it. Then, smash your mixture in there. One thing to note — I will probably use a cup of pecans next time.

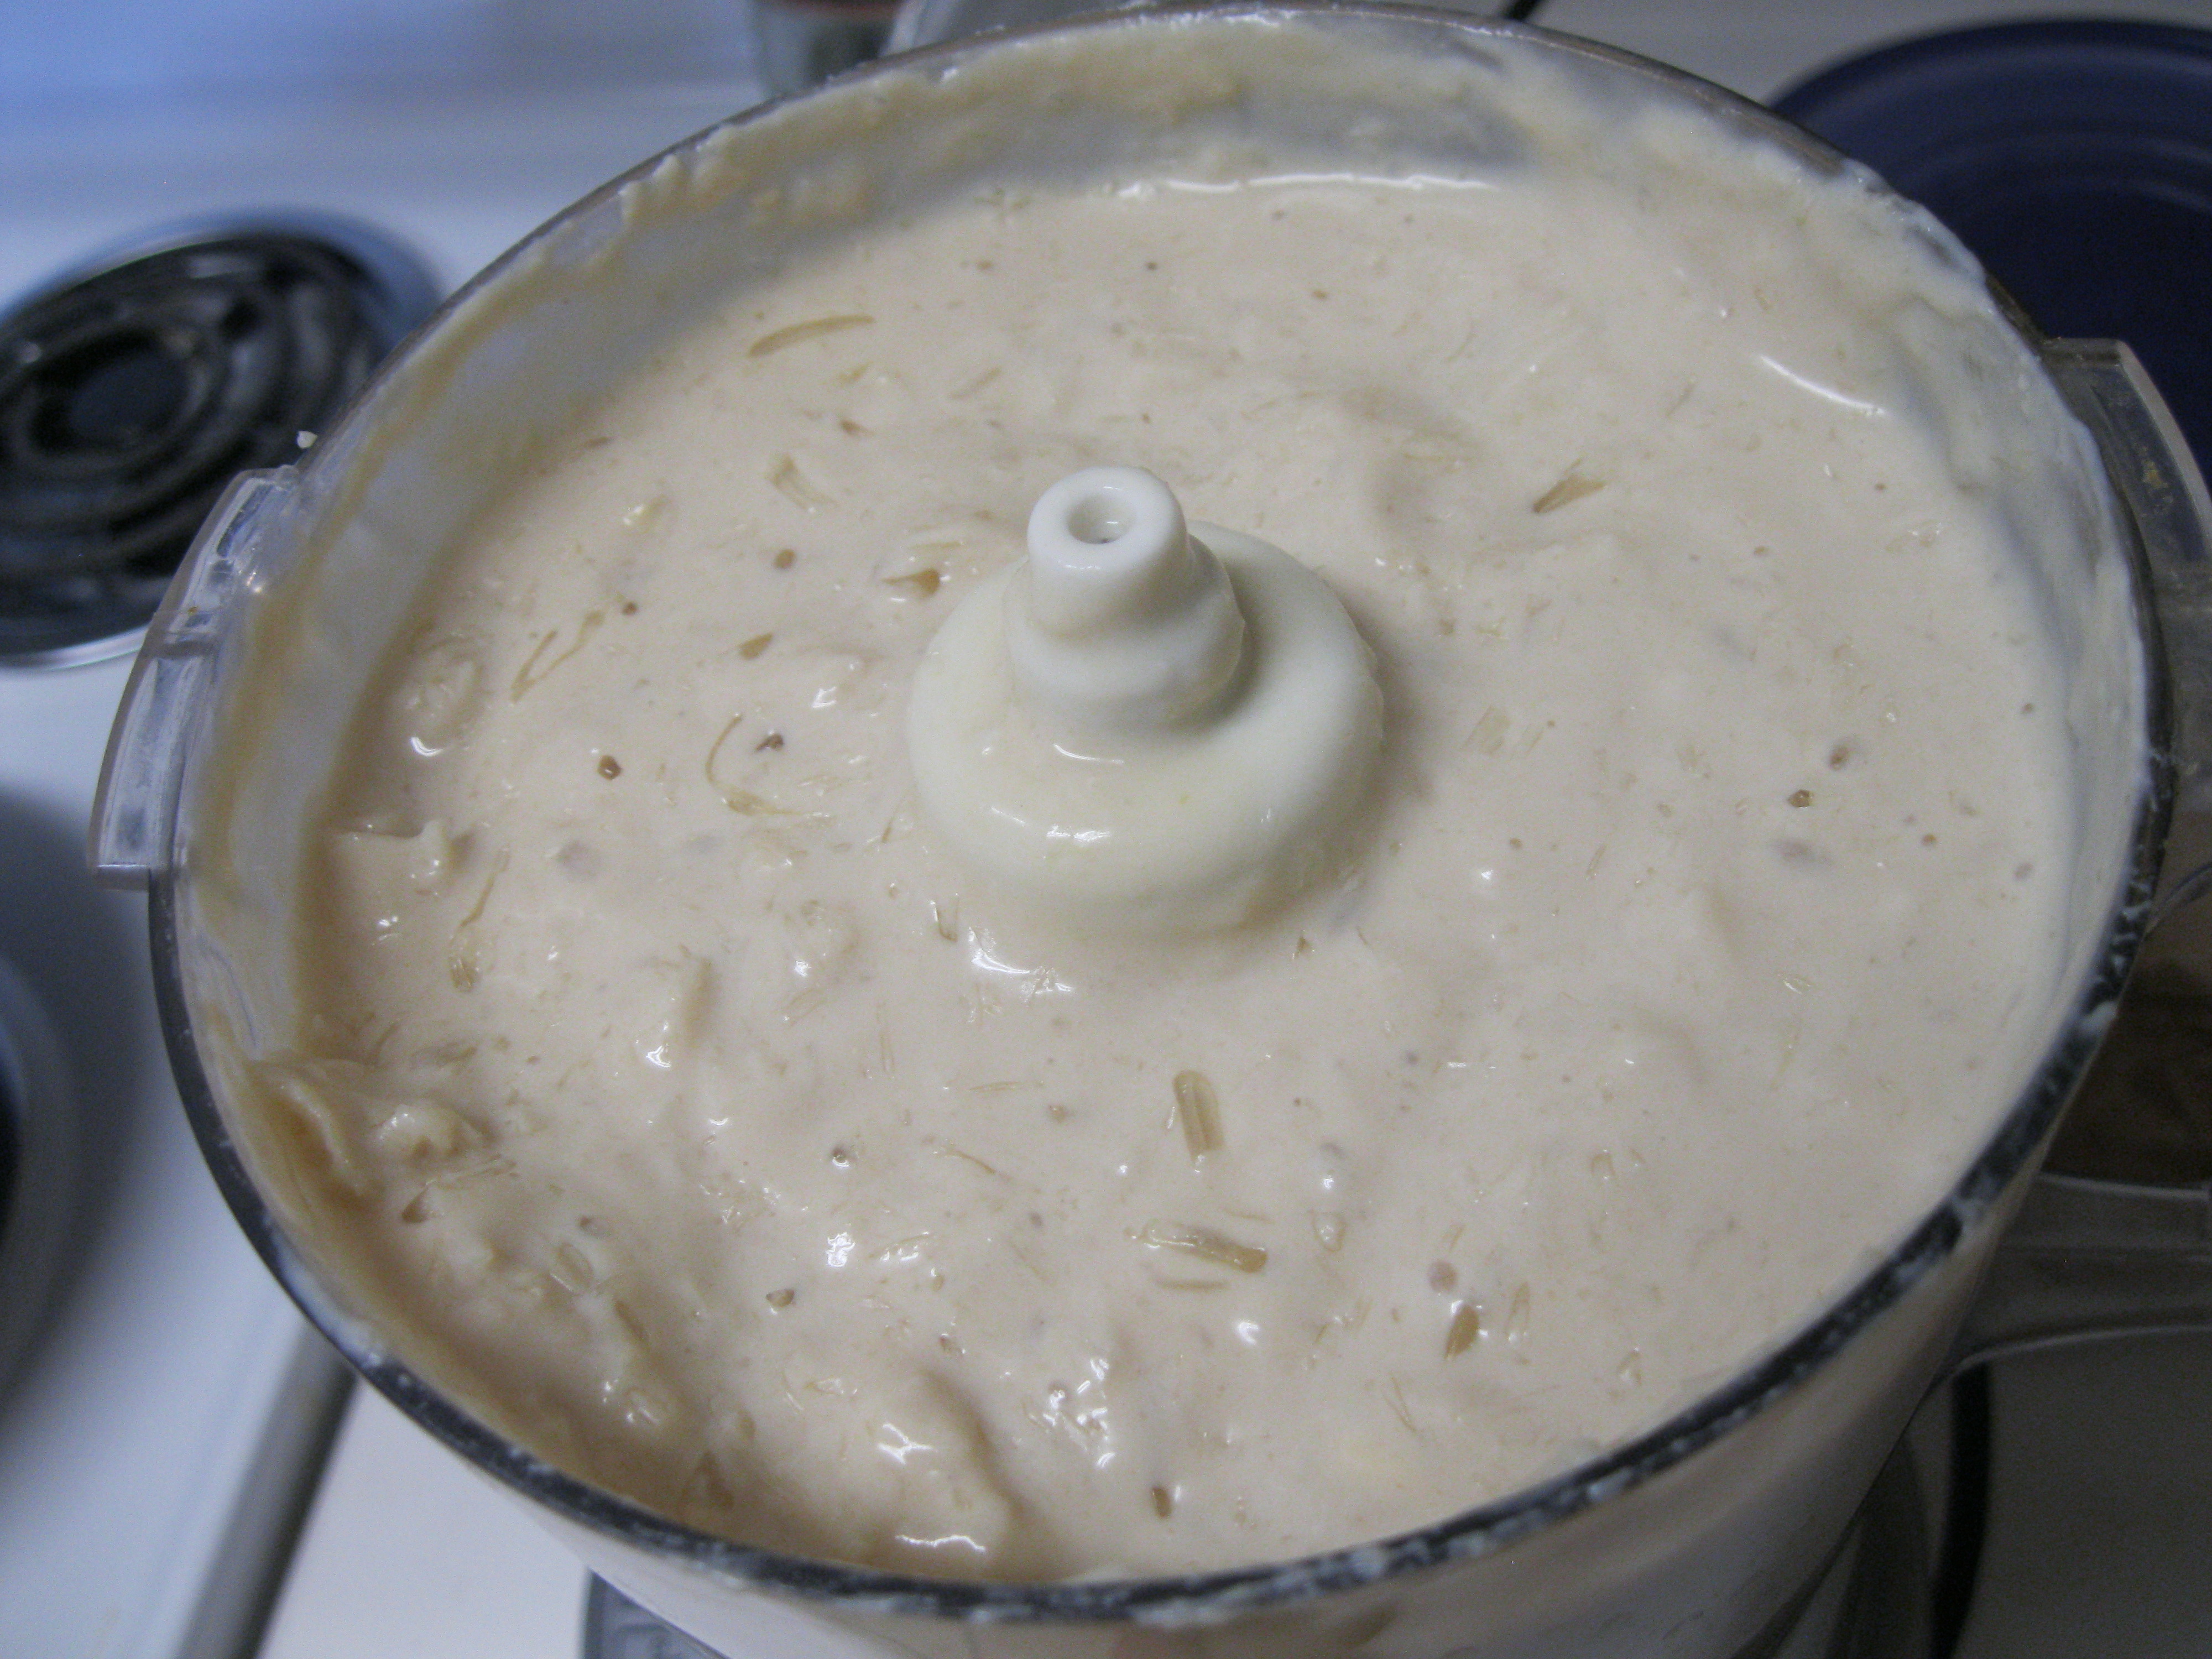
Now, the fun part. I used a blender for the filling again. I think I’ll try using a food processor for my next attempt. Anyway, drain the cashews. The blending method this time was to add a cup of cashews, add a liquid, add a cup of cashews, add a liquid, etc. It’s odd… I got frustrated because the cashews were just not breaking down into a creamy consistency, but (like the last time I made this) things seemed to magically get to a point where all the chunks were gone and I had my creamy nut filling. Mix about 1/4 cup of coconut flakes into the mixture if you desire.

Once your filling is ready, pour it into the pan. I poured it in about halfway and then decided to add some chocolate chips midway through. I found these mini chips at Whole Foods: they are dairy, nut, & soy free and are very delicious. Highly recommend! I also highly recommend that you be much more generous with the chocolate chips than I was. Next time, I’m seriously going to make it a layer of chocolate chips instead of this sorry sprinkle. Where was I now? Oh, yes. Pour the rest of the mixture into the pan and then even out the top.

‘Tis the season, so I thought it would be cute to decorate the top with chocolate chips in the shape of a snowflake. I clearly failed in my attempt. I stuck the cheesecake in the freezer to set for about 2 hours after which I placed it in the fridge.

Yummmm… this version turned out great! I think using pecans for the crust, adding the coconut flakes, and decreasing the lemon juice amount really made a difference. I cannot wait to try this out with some fruit or with a ton more chocolate chips. And I love that I can still brag that this is vegan, gluten-free, and soy-free!

Hope you’re enjoying the holidays. Don’t forget to eat lots of veggies! –Melissa

Tagged , , , , , , ,
%d bloggers like this: